This will only apply to you if you have a VPS or Dedicated server AND the cPHulk portion will only apply if you have cPanel/WHM installed.
If you have a VPS or Dedicated server without cPanel/WHM, then skip to Step 2.
I had a brand new server created for me with CentOS 7 and cPanel/WHM so that I could migrate from my older server. They provided the initial login and password to me, but I couldn’t log in to WHM. That’s odd, so I tried to shell in and it worked fine.
My first thought was that maybe my IP got blacklisted in cPHulk, so I checked the cPHulk database for an entry.
It turned out not to be this for me, so here’s what it was.
Step 1 – check cPHulk
This is how to check for cPHulk blocking you and how to remove your IP.
I was still shelled in as root, so it was just a matter of a few commands. IMPORTANT – replace 192.168.1.1 with your actual computer’s IP address. After you type “mysql” your prompt will either be mysql> or MariaDB> and these will work with either, but I’ll use mysql> just to simplify.
# mysql
mysql> use cphulkd
mysql> show tables;
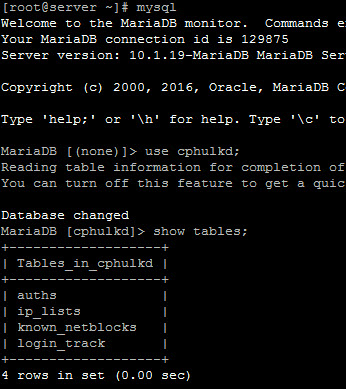
If you see this, then you have the new version of cPHulk:
MariaDB [cphulkd]> show tables;
+——————-+
| Tables_in_cphulkd |
+——————-+
| auths |
| ip_lists |
| known_netblocks |
| login_track |
+——————-+
If you see tables named “brutes” and “logins”, then you have the older version.
Use this for the newer version of cPHulk
# /scripts/hulk-unban-ip 192.168.1.1
That’s it, so on to the next step if you still can’t log in to WHM.
Use this for the older version of cPHulk
mysql> select * from brutes where IP = ‘192.168.1.1’;
If your IP is found, then use this to delete it:
mysql> delete from brutes where IP = ‘192.168.1.1’;
Let’s check the logins table too:
mysql> select * from logins where IP = ‘192.168.1.1’;
If your IP is found, then use this to delete it:
mysql> delete from logins where IP = ‘192.168.1.1’;
Step 2 – check the time
I almost did a complete reinstall of cPanel, but luckily I noticed all files had 2014 as the year instead of 2016.
I was still shelled in as root, so I set the correct date: date -s ‘2016-12-14 21:02:00’
SOLUTION
It turned out that cPHulk wasn’t blocking me and that it was just the date that was way out of sync.
I was now able to log in to WHM, so I went ahead and added my IP to the cPHulk whitelist to be sure.
Here’s how to do it from the shell: /scripts/cphulkdwhitelist 192.168.1.1